Monday, December 28, 2009

Export of SSRS reports to PDF generates extra blank pages.


In Reporting Server you have the option to export your reports to PDF. This works fine however sometimes extra blank pages are generated. For instance, the reports is rendered on your screen on 3 pages. After exporting to a PDF file you got a file with 6 pages. After every printed page with content you goy an empty page. This is caused by the fact that the width size of the body of the report must be less or equal to the width size of the report minus the sum of the left and right margins.

 Retrieve the body properties of a report:
  • Enable the properties window. (In Visual Studio, View, Properties Window)
  • Click on the body of the report. The property window will now display the size of your body.  


Retrieve the report properties of a report:
Click on the gray area outside the report. The property window will now display the size of your report.


In this example the width size of the body is 19.7 cm. The report width is 21 cm. The left margin of the report is 0.635 cm and the right margin of the report is 0.635 cm. To avoid an extra printed pages in the exported PDF file next formula is used.

width size of the body + left margin of the report + right margin of the report <= report width
In this example: 19.7 + 0.635 + 0635 < 21
Yes that's the case because 20.97 <= 21

Enjoy exporting your SSRS reports to PDF.

Sunday, December 27, 2009

SQL Azure Migration Wizard. BCP upload process failed: SQLState = 37000, NativeError = 40531


In SQL Azure the BACKUP and RESTORE functionality is not available. This makes it a little bit more complex to transfer existing data to the SQL Azure database. A way to upload data to SQL Azure is using BCP. The SQL Azure Migration Wizard makes use of BCP to upload your data. The SQL Azure Migration Wizard helps you migrate your local SQL Server 2005 / 2008 databases into SQL Azure. The wizard walks you through the selection of your SQL objects, creates SQL scripts suitable for SQL Azure, and allows you to migrate your data from:
  • SQL to SQL Azure
  • SQL Azure to SQL
  • SQL Azure to SQL Azure.


This tool can do a lot. A nice screen cast in which the author: George Huey explains what the tool can do can be found here:

I practise with this tool and could create the SQL objects, like tables very easy. The migration wizard can also check your scripts for compatibility issues with SQL Azure. However the upload of data always failed with next error message:

Process starting ...
-- Success: CREATE NONCLUSTERED INDEX [JournalStatusEntryGuid] ON [dbo].[amutak] ...
Uploading data to "Deltabike.dbo.amutak
*
*****
Sorry, but BCP upload process failed:
SQLState = 37000, NativeError = 40531
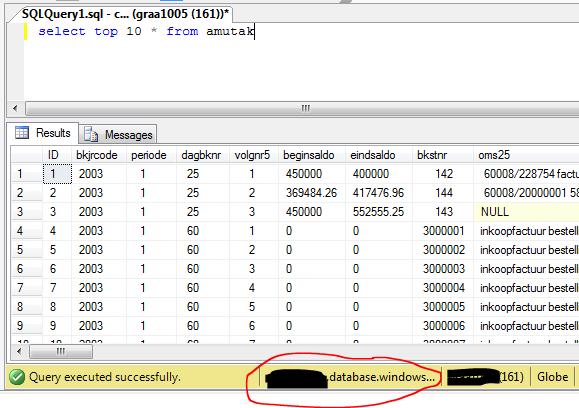
Error = [Microsoft][SQL Server Native Client 10.0][SQL Server]Server name cannot be determined. It must appear as the first segment of the server's dns name (servername.database.windows.net). Some libraries do not send the server name, in which case the server name must be included as part of the user name (username@servername). In addition, if both formats are used, the server names must match.

This error can be solved if you specify also the servername after the login name. @
instead of only


Enjoy uploading your data to SQL Azure.

Thursday, December 24, 2009

Query to retrieve missing indexes (suggestions) and existing indexes of a table in one resultset.


Performance of your application can change over time. This can have various reasons like:
  1. New functionality added to the product.
  2. Changes in the implementation of the product.
  3. Customer specific usage.
Because of these reasons it can happen that the current index structure is not optimal. Some new indexes are needed to create and some indexes can be dropped because they are not used. For index suggestions and index usage statitstics you can run seperate queries. However analyzing 2 different resultsets is not always easy. Download next query to combine both results sets in one resultset.


Have fun in optimizing your index structure.

Tuesday, December 22, 2009

Getting Started with SQL Azure, create your first SQL database in the cloud.


Microsoft® SQL Azure™ Database is a cloud-based relational database service built on SQL Server® technologies. As said by Microsoft SQL Azure should:
  1. Provide a highly available, scalable, multi-tenant database service hosted by Microsoft in the cloud. SQL Azure Database helps to ease provisioning and deployment of multiple databases.
  2. Developers do not have to install, setup, patch or manage any software.
  3. High availability and fault tolerance is built-in and no physical administration is required.
  4. SQL Azure Database supports Transact-SQL (T-SQL). Customers can use existing knowledge in T-SQL development and a familiar relational data model for symmetry with existing on-premises databases.
  5. SQL Azure Database can help reduce costs by integrating with existing toolsets and providing symmetry with on-premises and cloud databases.
These statements sounds very promising. Therefor I started creating a SQL Azure database in the cloud to see the current status of the cloud-based relational database service.

First of all you need a SQL Azure account. Request an invitation code for yourself.  Within one day you will receive the invation code which enables you to create your own SQL Azure Server. To create a server you need to specify and Administrator Username and an Administrator Password.

Now your server is created with one database: Master.
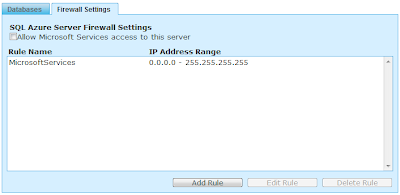
To access this server you need to configure the firewall settings. Press on the Firewall Settings tab and click on checkbox "Allow Microsoft Services acccess to this server". Select the Rule MicrosoftServices and press the Edit Rule button. Now you can specify the range of IP adresses which are allowed to connect to your Azure Server. In my example I have configured all IP addresses.


Now we will create the first database. Select the Databases tab. Press Create Database, Specify a database name and the size of the database. You can choose between 1 Gb and 10 Gb.


Press the Test Connectivity button to test the connection. You MUST have the MicrosoftServices Firewall rule enabled in order to use this feature. Your database is created and you are ready to connect with the SQL Server Management Studio (SSMS). For the Object Explorer you have enter the Server name and Login credentials.


To open a new query you need to specify the database you want to connect. This canbe done in the connection propertie tab. The USE command is not supported for switching between databases. Establish a connection directly to the target database.


Now you are connected.


Enjoy using SQL Azure.

Monday, December 21, 2009

How to drilldown on a reporting server map report in SQL 2008 R2?

In my previous blogpost I described the maps as one of the nice new features of SQL 2008 R2 Reporting Server. These maps can easily be added to your reports if you have a dataset with geography data. In my blogpost: How to enrich your account data with latitude, longitude and geography data? you can add geography data to your dataset. Adding a map in your report for your dataset with geopgraphy data is simple to do. However drilldown or zoom functionality is more difficult to use. This blogpost will explain how you can create maps with drilldown functionality.

The Reporting map control make use of Bing maps which automatically centers and zooms in to the locations of your dataset. To drilldown or zoom we need to start the same report with a smaller dataset. To create a smaller dataset I make use of the data awareness of the reporting map control. When I click on a map point the values of the map point will be used to make the dataset smaller. I created a stored procedure with some parameters. These parameters gets their values from the data awareness of the reporting map control. The stored procedure will drilldown from World, Continent, Country, State to City. I have a table with accounts. Every account has their Countrycode, Statecode and City. I used a Join to the continents table in which every country in the world is linked to a continent. Please download the stored procedure from this location.


  1. Create the stored procedure in your database.
  2. Create a new report
  3. Create a new dataset and select the stored procedure: LocContinentCountryStateCityMap


  4. Report parameters are automatically added to the reports based on the content of the stored procedure: LocContinentCountryStateCityMap.

    Configure all 4 parameters as Hidden and allow NULL values.
    Configure Default value (NULL) for all 4 parameters.


  5. Drag the Map report item to your report. The new map layer wizard is started.


  6. Select SQL Server spatial data.
  7. The wizard will display all datasets with spatial data in it. In this example the resultset of the stored procedure.


  8. Select this dataset and press Next.
  9. Now you get an error: Unable to determine the spatial data type due to connection error. This is correct because the stored procedure need some parameter values which are not known by the wizard. Press OK.
  10. Mark Add a Bing Maps Layer and select a Tile Type: Road.
    Select Layer Type: Point


  11. Press Next and select the Basic Marker Map.
  12. Press Finish.
  13. Now, we have a map with the spatial data and are ready to configure the drilldown functionality.
  14. Drilldown will make use of the data awareness of the reporting map control. Click on a map point and right click with your mouse. Select Point properties. If you get Viewport Properties, you have not select the map point.
  15. Select Action.
    Go to report: Specify the report you are making. Add the 4 parameters to this report action.


    This means the report will start the same report. However with other parameter values. These parameter values are added one by one after every drill down in the stored procedure.

    Now the report is ready to run and drill down.
    Enjoy it.
 

Tuesday, December 1, 2009

How to enrich your account data with latitude, longitude and geography data?

In SQL 2008 R2 one of the new interesting visualization features are the maps. To use the maps for you accounts you need to enrich the account data with geography data. In this blog I will explain how you can enrich your account data with Google geography data by making use of a SQL Server integration packages. To enrich your account data you can make use of Google or BING Maps. I uses Google because:
  • Performance to enrich your account data with geography data is much better than Bing Maps.
  • With Google I can use the GUID, which is the key, in my table as the key. In BING Maps the GUID is not recognized, you need to use an Integer.
To enrich your data via Google you need to have an API key which you can get when you sign up for the Google Maps API. Please read the terms and conditions in which situation you can use this API key. Otherwise you need to use the Google Maps API Premier.


This example is based on an Exact Globe or Exact Synergy database in which the table Cicmpy exists. The Cicmpy table is used to store all account information. In case you want to update account data from another table, some minor extra changes need to be done.  Please execute downloaded script: CreateCicmpyGeoUpdate.SQL This script will add some columns to the Cicmpy table and will create a table to update the geography data by the SSIS package.

  1. Download the CicmpyGeoUpdate.rar Extract the CicmpyGeodataGoogleMaps.dtsx package in folder on your server. The package need to be configured for your environment.
  2. Create a new SSIS project in Microsoft Visual Studio 2008.
  3. Add the CicmpyGeodataGoogleMaps.dtsx package to your project.
  • In the solution explorer, right mouse click on SSIS packages, add existing package)
  • Choose File System as package location and browse to the location where you have downloaded CicmpyGeodataGoogleMaps.dtsx
  • Open the package by double clicking on the package name in the Solution Explorer.
  1. Configure the Connection Manager. The connection manager connection is used by the package to know in which database he needs to enrich the account data.
  • Select GRAA1005-2.ExactGeoTest, right mouse, Edit.
  • Specify your SQL Server and Database name
  • Press Test Connection to test if you can connect to the database.


  1. Configure the package
  • Open the dataflow task. Press on the Data Flow tab.


  • Configure the OLE DB Source connection. Select OLE DB Source, right mouse click, Edit. Check if the correct OLE DB connection manager is selected.

  • In case you are using another table for your account data you need to rewrite the SQL query. Change your table and columns but use the AS Address, AS ZIPCode for the column names of the result set. These columns names are used in the script to recognize the street, zip code etc.
  • Install the Google Maps API key in the Script. Edit Script Component. Select Script Component, right mouse click, Edit.
  • Press the Edit Script button.
  • Open the GeoCode.vb and paste your Google Maps API key between the " "


  • Save the script and build the project and close the project.
  • Configure the OLE DB Destination. Check the configured OLE DB Connection Manager. Select 'Table or View fast load' as Data access mode and select CicmpyGeoUpdate table 


  1. Save the package and you can start the package.
  2. The package will insert all geography data in the table CicmpyGeoUpdate with the GUID of the account as the key. Execute next script to update the account table Cicmpy with all geography data.

    UPDATE Cicmpy
    SET GeographyCol = Geography::Point(CGU.Lat, CGU.Long, 4326),
    Lat=CGU.LAT,Long=CGU.Long,
    Accuracy = CGU.Accuracy
    FROM Cicmpy C
    INNER JOIN CicmpyGeoUpdate CGU ON C.Cmp_wwn = CGU.cmp_wwn
    WHERE CGU.Lat is not NULL
  3. Everytime the package is executed, records are added to the CicmpyGeoUpdate table. After a succesfull update of the account data in step 6 you can truncate the table CicmpyGeoUpdate.

    Truncate table CicmpyGeoUpdate

    Enjoy using geography data. Later on I will post a blog about using geography data with SQL 2008 R2 Reporting Services.


Tuesday, November 24, 2009

SQL Server 2008 R2 CTP November with some nice visualization features.


The feature complete build of SQL 2008 R2 is available for download. This November CTP build fixes the issue I blogged in the past: The report definition has an invalid target namespace 'http://schema.microsoft.com/sqlserver/reporting/ 2009/01/reportdefinition' which cannot be upgraded.

Now it is possible to install SQL 2008 R2 Reporting Server on a machine which you uses to build and deployed SQL 2008 reports. Please read the details about how you can use an installation of SQL 2008 R2 on a machine with SQL 2008:

- RDL files: In the SQL Server 2008 R2 version of Business Intelligence Development Studio, you can work with both SQL Server 2008 R2 and SQL Server 2008 versions of report definitions and Report Server projects.


If you open, update, and then save a SQL Server 2008 report definition, it is saved as SQL Server 2008 report definition unless you added features that are new SQL Server 2008 R2.

- SSRS projects: You can add and open SQL Server 2008 Report Server projects to solutions that you create using the SQL Server 2008 R2 version of Business Intelligence Development Studio.

However , if you save the SQL Server 2008 Report Server project it saved as SQL Server 2008 R2 Report Server project and you can no longer open it in the of Business Intelligence Development Studio

 
Enjoy using SQl 2008 R2 with next nice data visualization features:

Maps to visualize of for instance your customers. Read: How to enrich your account data with longitude, latitude and geography data.


Indicators


Sparklines


Data bars


Monday, November 16, 2009

Exact Synergy Enterprise certified for Windows Server 2008 R2


As of product update 240, Exact Synergy Enterprise is certified for the latest  Microsoft server platform Windows Server 2008 R2. This is another great step of Exact in supporting the latest technology of Microsoft. Exact Synergy Enterprise can be used in 32 bits or 64 bits mode.
Exact Synergy Enterprise and Exact Globe now supports the latest available Microsoft operatings systems like Windows 7, SQL2008 and Windows Server 2008 R2.

Sunday, November 1, 2009

My favorite SQL Server Management Studio settings


I work a lot with SQL Server Management Studio (SSMS). From a performance perspective I'm not so happy with the default settings of this application. Therefor I made some changes to the settings of SSMS.
To made changes to the setting of SSMS start SSMS and select Tools, Options in the menu.


  1. Startup with an empty environment. (Environment, General, At startup: Open empty environment)
  2. To avoid to lock other users when you execute long running SELECT queries. Set the default transaction isolation level to: READ UNCOMMITTED (Query Execution, SQL Server, Advanced, SET TRANSACTION ISOLATION LEVEL)
  3. Include column headers when copying or saving results. (Query Results, SQL Server, Result to Grid)
  4. Quote strings containing list seperators when saving to .csv results. (Query Results, SQL Server, Result to Grid)
  5. Word wrap. This is a setting which I changed a lot depending on the kind of queries I'm analyzing. (Text editor, Plain Text, General, Settings)
Enjoy using SSMS

Tuesday, October 13, 2009

Using SQL Profiler Trace without the SA server role


By default users who has the SA role (SysAdmin) server role on the SQL server are able to trace activity on the SQL server with SQL Profiler. However not all users who need to trace SQL server activity will have the SA server role. To give users permissions to run SQL Profiler traces without the SA role, you need to grant ALTER TRACE permissions to the these users.

For instance grant SQL Profiler permissions to the user account Mark from domain MyCompany:

GRANT ALTER TRACE to [MyCompany\Mark]

For more information see: Permissions required to run SQL Profiler trace.

Monday, October 5, 2009

IIS Database Manager to easily manage your local and remote databases within IIS Manager

IIS Database Manager allows you to easily manage your local and remote databases from within IIS Manager. IIS Database Manager automatically discovers databases based on the Web server or application configuration and also provides the ability to connect to any database on the network. Once connected, IIS Database Manager provides a full array of management options including managing tables, views, stored procedures and data, as well as running ad hoc queries.

IIS Database Manager provides native support for SQL Server and is also fully extensible for developers to add support for other database systems. In addition, because IIS Database Manager is an extension of IIS Manager, administrators can securely delegate the management of databases to authorized local or remote users, without having to open additional management ports on the server.


First of all install the IIS Database Manager of your web server.
Start the IIS Manager.
Select your web server
In the management view click on the Database Manager icon


Create a database connection to the database you want:


Open your connection:


Press on the new query button:


Now you can start executing queries on your database


Be aware this is a simple query analyzer. You can't for instance retrieve query plans etc. But for simple checks it can be a nice tool without the need to install the full SQL Server Management Studio (SSMS)


Wednesday, September 30, 2009

Exact Globe compatible with Windows 7


On 22 october 2009 Windows 7 will become commercial available. Exact Software has become one of the first European software vendors to receive this certification. By the time the Microsoft Worldwide Partner Conference took place in July, Exact Globe was certified and ready to run on Windows 7. More information about Exact Globe running on Windows 7 can be found on the Exact Product Blog and on the Ready.Set.7 site of Microsoft.
On the Ready.Set.7 website you’ll find the Exact logo and behind it, a short piece describing the advantages.
A short film featuring Aad ‘t Hart can also be viewed, in which he gives his views on what Windows 7 can do for our customers. “Windows 7 increases the productivity of the Exact Globe end user,” Aad says.

With Exact Globe you are now able to run on the most recent available technology with Windows 7 and SQL Server 2008. Don't forget that you can buy SQL 2008 licenses for the use with Exact products with a big discount via Exact.

Tuesday, September 15, 2009

Use batches to delete large number of records in a table

Sometimes it can happen that you need to delete a lot of records in a table. This can happen for instance in log tables. With a simple DELETE statement like:

DELETE FROM MyTable WHERE COL1 = 1

it can take a while when you have for instance 1 million records to delete. It can results in a table lock which has a negative impact on the performance of your application.

As of SQL2005/2008 you can delete records in a table in batches with the DELETE TOP (BatchSize) statement.  This method has 3 advantages
  1. It will not create one big transaction.
  2. It avoids a table lock.
  3. If the delete statement is canceled, only the last batch is rolled back. Records in previous batches are deleted.
You can use next script to test this DELETE TOP () statement.

CREATE TABLE DEMO (COL1 INT,COL2 INT)


DECLARE @COUNTER INT
SET @COUNTER = 1

INSERT INTO DEMO (COL1,COL2) Values (2,2)

WHILE @COUNTER < 50000
BEGIN

INSERT INTO DEMO (COL1,COL2) Values (1,@COUNTER)
SET @COUNTER = @COUNTER + 1

END

/*
-- Show content of the table
SELECT COL1, COUNT(*) FROM DEMO GROUP BY COL1
*/

-- Deleting records in batches of 1000 records

DECLARE @BatchSize INT
SET @BatchSize = 1000

WHILE @BatchSize <> 0

BEGIN

DELETE TOP (@BatchSize)
FROM DEMO
WHERE COL1 = 1

SET @BatchSize = @@rowcount

END

-- SELECT * FROM Demo -- Now we have only 1 record left


Monday, August 31, 2009

The report definition has an invalid target namespace 'http://schema.microsoft.com/sqlserver/reporting/2009/01/reportdefinition' which cannot be upgraded.

This week I installed the CTP version of SQL Server 2008 R2 as a seperate instance on my laptop to test. This laptop is also used to build and deploy reports to SQL 2008 reporting servers. The installation can be done without any problem, however the tools can't be installed seperate. The SQL 2008 R2 tools make use of the same components as the tools of SQL Server 2008. After having installed these SQL 2008 R2 tools you are able to open, modify and save your SQL 2008 reports. However after saving these reports you can't deploy them anymore to a SQL 2008 reporting server. If you try to do this you will get next error:

 The report definition has an invalid target namespace 'http://schema.microsoft.com/sqlserver/reporting/2009/01/reportdefinition' which cannot be upgraded.

To be able to deploy reports to SQL 2008 on my laptop, I have unstalled the tools of SQL 2008 R2 and reinstalled the SQL 2008 tools. After that I restored a backup of my SQL 2008 reports.

Microsoft it would be nice if these tools do not have shared components with previous releases. This will make testing of these products much easier.  Now I need to install a seperate machine to test the CTP version of SQL 2008 R2. Or does anybody have another solution for this?

Friday, August 28, 2009

Index statistics and suggestions of a table in one query.

To optimize the index structure of tables in your database, you need to get information how these indexes are used. On the other hand you want to know if new indexes can improve the performance of your database. Index usage statistics and index suggestions are stored by the SQL Server engine as of SQL 2005.  With next query you can combine the index usages statistics and suggestions in one query. It will help you to improve the performance of your database.

Be aware to look very critical to all index suggestions. Suggestions have no relation to each other. Therefor do not add all index suggestions at the same. Add one index and analyze the results after a while and re-execute the query.

To use this script specify the table you want to analyze in the second line. In this example the table GBKMUT is analyzed.  If the table you specified does not exist, it will return all statistics and suggestions of all table in your database. A lot of success with improving your database.

DECLARE @ObjectID int

SELECT @ObjectID = OBJECT_ID('GBKMUT')

;WITH preIndexAnalysis
AS (
SELECT
OBJECT_SCHEMA_NAME(t.object_id) as schema_name
,t.name as table_name
,COALESCE(i.name, 'N/A') as index_name
,CASE WHEN i.is_unique = 1 THEN 'UNIQUE ' ELSE '' END + i.type_desc as type_desc
,NULL as impact
,ROW_NUMBER()
OVER (PARTITION BY i.object_id ORDER BY i.is_primary_key desc, ius.user_seeks + ius.user_scans + ius.user_lookups desc) as ranking
,ius.user_seeks + ius.user_scans + ius.user_lookups as user_total
,COALESCE(CAST(100 * (ius.user_seeks + ius.user_scans + ius.user_lookups)
/(NULLIF(SUM(ius.user_seeks + ius.user_scans + ius.user_lookups)
OVER(PARTITION BY i.object_id), 0) * 1.) as decimal(6,2)),0) as user_total_pct
,ius.user_seeks
,ius.user_scans
,ius.user_lookups
,STUFF((SELECT ', ' + QUOTENAME(c.name)
FROM sys.index_columns ic
INNER JOIN sys.columns c ON ic.object_id = c.object_id AND ic.column_id = c.column_id
WHERE i.object_id = ic.object_id
AND i.index_id = ic.index_id
AND is_included_column = 0
ORDER BY index_column_id ASC
FOR XML PATH('')), 1, 2, '') AS indexed_columns
,STUFF((SELECT ', ' + QUOTENAME(c.name)
FROM sys.index_columns ic
INNER JOIN sys.columns c ON ic.object_id = c.object_id AND ic.column_id = c.column_id
WHERE i.object_id = ic.object_id
AND i.index_id = ic.index_id
AND is_included_column = 1
ORDER BY index_column_id ASC
FOR XML PATH('')), 1, 2, '') AS included_columns
,i.object_id
,i.index_id
,STUFF((SELECT ', ' + QUOTENAME(ic.column_id,'(')
FROM sys.index_columns ic
WHERE i.object_id = ic.object_id
AND i.index_id = ic.index_id
AND is_included_column = 0
ORDER BY index_column_id ASC
FOR XML PATH('')), 1, 2, '') AS indexed_columns_compare
,COALESCE(STUFF((SELECT ', ' + QUOTENAME(ic.column_id, '(')
FROM sys.index_columns ic
WHERE i.object_id = ic.object_id
AND i.index_id = ic.index_id
AND is_included_column = 1
ORDER BY index_column_id ASC
FOR XML PATH('')), 1, 2, ''), SPACE(0)) AS included_columns_compare
FROM sys.tables t
INNER JOIN sys.indexes i ON t.object_id = i.object_id
LEFT OUTER JOIN sys.dm_db_index_usage_stats ius ON i.object_id = ius.object_id AND i.index_id = ius.index_id AND ius.database_id = db_id()
WHERE t.object_id = @ObjectID OR @ObjectID IS NULL
UNION ALL
SELECT
OBJECT_SCHEMA_NAME(mid.object_id) as schema_name
,OBJECT_NAME(mid.object_id) as table_name
,'--MISSING--'
,'--NONCLUSTERED--'
,(migs.user_seeks + migs.user_scans) * migs.avg_user_impact as impact
,0 as ranking
,migs.user_seeks + migs.user_scans as user_total
,NULL as user_total_pct
,migs.user_seeks
,migs.user_scans
,0 as user_lookups
,COALESCE(equality_columns + ', ', SPACE(0)) + COALESCE(inequality_columns, SPACE(0)) as indexed_columns
,included_columns
,mid.object_id
,NULL
,NULL
,NULL
FROM sys.dm_db_missing_index_details mid
INNER JOIN sys.dm_db_missing_index_groups mig ON mid.index_handle = mig.index_handle
INNER JOIN sys.dm_db_missing_index_group_stats migs ON mig.index_group_handle = migs.group_handle
WHERE database_id = db_id()
AND mid.object_id = @ObjectID OR @ObjectID IS NULL
)
SELECT schema_name
,table_name
,index_name
,type_desc
,impact
,user_total
,user_total_pct
,CAST(100 * (user_seeks + user_scans + user_lookups)
/(NULLIF(SUM(user_seeks + user_scans + user_lookups)
OVER(PARTITION BY schema_name, table_name), 0) * 1.) as decimal(6,2)) as estimated_percent
,user_seeks
,user_scans
,user_lookups
,indexed_columns
,included_columns
,STUFF((SELECT ', ' + index_name AS [data()]
FROM preIndexAnalysis iia
WHERE ia.object_id = iia.object_id
AND ia.index_id <> iia.index_id
AND ia.indexed_columns_compare = iia.indexed_columns_compare
AND ia.included_columns_compare = iia.included_columns_compare
FOR XML PATH('')), 1, 2, '') AS duplicate_indexes
,STUFF((SELECT ', ' + index_name AS [data()]
FROM preIndexAnalysis iia
WHERE ia.object_id = iia.object_id
AND ia.index_id <> iia.index_id
AND (ia.indexed_columns_compare LIKE iia.indexed_columns_compare + '%'
OR iia.indexed_columns_compare LIKE ia.indexed_columns_compare + '%')
AND ia.indexed_columns_compare <> iia.indexed_columns_compare
FOR XML PATH('')), 1, 2, '') AS overlapping_indexes
FROM preIndexAnalysis ia
ORDER BY schema_name, table_name, ROW_NUMBER() OVER (PARTITION BY schema_name, table_name ORDER BY user_total desc, ranking), index_name

Wednesday, August 5, 2009

White paper: Using the Resource Governor to manage performance of your SQL 2008 Enterprise Edition server

Microsoft has published a white paper about the Resource Governor. The Resource Governor provides enterprise customers the ability to both monitor and control the way different workloads utilize CPU and memory resources on their SQL Server instances. With the Resource Governor you, as DBA, have a new way to better manage the performance of your SQL server.
This white paper is targeted at IT professionals and database administrators responsible for managing scale, concurrency, high availability, consolidation, virtualization, or service level agreements for the SQL Server instances in their production environments. In this paper you are shown various ways in which you can use the Resource Governor to analyze and streamline the way resources are utilized within your SQL Server instances, by explaining:


  • How the Resource Governor works, including limitations and best practices.
  • Methods for building a consolidation plan, and testing those methods.
  • Techniques for preventing runaway queries, or at least minimizing their impact.
  • Approaches to meeting service level agreements (SLAs) driven by response time and concurrency.
  • Basic ideas about implementing a chargeback system to recover resource costs.
  • Ways to monitor SQL Server using new Resource Governor functionality.
The paper will highlight several common usage scenarios, help you decide when and where to use the technology, and outline best practices when using the Resource Governor.

Enjoy reading of this document

Tuesday, July 14, 2009

Book review: SQL Server 2008 Internals

One of the topics I'm interested in is performance of a database. Based on this topic I read the book SQL Server 2008 Internals. I enjoyed to read this book. It is easy to read and usefull for people with and without knowledge of previous versions of SQL Server. After reading this book it will help you to better understand the performance of your SQL Server configuration and databases. I can imagine that everybody has it's own favorite topics when reading this book. This is the list of my  favorite topics:

  • SQL Server Resource Governor
  • Indexes: Internals and Management
    • Tools for analyzing indexes.
    • Data modification Internals
    • Managing index structures
  • Special Storage
    • Sparse columns
    • Data compression
  • The query optimizer
    • Optimizer architecture
    • Statistics, Cardinality Estimation and Costing
    • Index selection
    • Plan Hinting
  • Plan Caching and Recompilation
    • Cache mechanisme
    • Plan cache internals.
  • DBCC Internals.
I think it is a usefull investment of only 52 Euro (60 US Dollar). It is a must to have for every DBA'er who wants to deliver the best performance of his SQL server environment to his users. This also applies to software engineers who want to build well performing applications on SQL Server.

Happy reading.

Tuesday, July 7, 2009

Performance improvement: Disk Partition alignment Best Practices for SQL Server

Disk partition alignment is a powerful tool for improving SQL Server performance. Configuring optimal disk performance is often viewed as much art as science. A best practice that is essential yet often overlooked is disk partition alignment. Windows Server 2008 attempts to align new partitions out-of-the-box, yet disk partition alignment remains a relevant technology for partitions created on prior versions of Windows. This paper documents performance for aligned and nonaligned storage and why nonaligned partitions can negatively impact I/O performance; it explains disk partition alignment for storage configured on Windows Server 2003, including analysis, diagnosis, and remediation; and it describes how Windows Server 2008 attempts to remedy challenges related to partition alignment for new partitions yet does not correct the configuration of preexisting partitions. The following topics are also included: background information, implementation, vendor considerations, two essential correlations, valid starting partition offsets, and the simple protocol to align partitions, define file allocation unit size, and assign drive letters. It includes results from tests that show how partition alignment can affect performance for SQL Server 2008.

Microsoft has published a usefull best practices document about this topic. Take your time to read and understand it. It can improve your performance of your disks up to 30% depending on your storage configuration. 
Within my company Exact we have seen a performance improvement of 10% with aligned partitions on a HP EVA 5000 storage system.

The good news is that partition alignment is simple to perform; The bad news is that partition alignment must be done at partition creation time, prior to partitions being formatted. This is great if you have a new SAN, but it might be painful to convert large amounts of existing data on misaligned partitions. Correct disk partition alignment is done by default on Windows Server 2008. On prior versions of Windows Server partitions are misaligned by default.

More details and test results about EVA Partition alignment can be found here

Friday, July 3, 2009

My visit to the first tweetup of Dutch Minister Verhagen of Foreign Affairs.


Today, I was invited by our Dutch Minister of Foreign Affairs Maxime Verhagen to join his first tweetup. He organized this tweetup to celebrate the fact that he has more than 10.000 followers. It was a nice event. Maxime told about his experience with Twitter.
  1. In the Dutch House of Representatives it is not allowed to Twitter because representatives should listen. However it is allowed to write 140 characters on paper. A messenger will bring this paper to his spokesman. His spokesman is now able to tweet the message. I think the chairmain of the Dutch House of Representatives should allow tweets. Accept this new way of communication. People will always find their way to be able to tweet. Maxime reaction on this: 'I do not listen with my fingers.'
  2. People do not understand that Maxime has time to tweet. As Minister of Foreign Affairs Maxime travels a lot. During travelling by car, plane, ..... you always have some time to tweet.
  3. It is nice way to get feedback on what you are doing. Postive feedback is nice, but you can learn from negative feedback and take action on it.
  4. He told about his twitpic from the Treves zaal. This was not allowed. He was suprised because a lot of pictures are available on the internet of the Treves zaal. Only official pictures of the Treves zaal are allowed. The end result of this discussion resulted in a lot more followers for Maxime.

My observations during this event:
  1. Average age of the attendees was around 35. This was higher as what I expected. Maybe because the generation Y is not interested in politics and there for not following politicans like Maxime. I saw a womam which could be my mother. Nice to see that people from that generation can make the shift to the new way of communication.
  2. The spokesman of Maxime is not twittering.
  3. Most guests are twittering since the last 6 months.
  4. Most guests are twittering from a personal perspective, not from a business perspective.
  5. Some guests are following Maxime to understand what he is doing as Minister of Foreign Affairs others are following Maxime to understand his political point of view and a group who are interested in the way Maxime uses social media.
  6. Mixture of Nokia Smartphone, Blackberries, IPhones to tweet live. But also a group of people which only make their tweets via a PC.
  7. Everybody is looking forward to the next tweetup. For instance a BBQ on the Binnenhof

The Twitters: @rotjong, @kruithoph @tonyjansen @jacokoster @zorg20 made a nice certificate for Maxime: Minister Tweep. The first minister which is using Twitter in a formal way.


Thanks Maxime for organizing this tweetup. I have enjoyed it. More politicans should follow your way of using social media.